- see also: Category:Minigame (Zone Type)
Rules for All Minigames[ | ]
Each minigame can be played once per day for the cost of ![]() Phirius Token Coin ×30.
Phirius Token Coin ×30.
It is advised to be at least level 50 to participate in these minigames. Enemies in the minigames are based around your level. However if you are not level 50 or higher you will not receive any ![]() Phirius Shells.
Phirius Shells.
Note: If you are killed within a minigame, you do not accrue XP/TP debt, but you are kicked out of the minigame for the day. (Goblin Mines sometimes gives you XP/TP debt.)
[ | ]
Treasure chests in minigames share a loot table - here's a list of some of the things you can find in them (These are not the same as the Minigame Rewards, which are unique to each game) (Andor Training Range does NOT share this drop list.)
 Phirius Potion (HP % recovery)
 Phirius Elixir (MP % recovery)
- Phirius Special Water (HP/MP % recovery)
- Phirius Token Coin ×5
- Phirius Token Coin ×10
- Bundles of 3-5 guild resources (ore, wood, herb - each worth 100 at guild resource turn in)
- Crafting recipes for items around level 50 (usually blue, can contain white, green, and purple also)
- Craftsman's Recipe Coupon
- Recipe - Simple Senior Apprentice's Wooden Chest
- Recipe - Functional Senior Craftsan's Tailoring Chest
- Recipe - Large Simple Superior Iron Chest
- Horse Rental Ticket
- Simple Repair Hammer
- Vendor Trash equipment around level 50
Enemies in minigames will drop items typical for their level, including white/green equipment, tier III or IV runes, and so on.
Malatina's Survival Game[ | ]
- Number of Players: 1
- Time Limit: 10 minutes
- How to Enter: Talk to Malatina [Strange Clown] in Varanas Central Plaza and choose "Survival Game" in the conversation window.
- Game Layout: A 6x6 grid of Treasure Tiles where treasures and traps are buried, with a magic wand in the middle that talks and randomly casts an AOE knockdown spell.
- Objective: Open all 36 Treasure Tiles and all 12 Brown Wooden Chests.
Guide[ | ]
Attack the machines and kill the guard that spawns from each one.
Guards have poor loot so consider not looting them to save time.
The Golems that may appear from a treasure tile have better loot so you may want to loot them.
The knockdown can't reach you on the edges of the corner tiles.
If you find a bomb, move away by at least 3 tiles to avoid the damage and knockdown.
Note: Priests can cast Holy Aura to prevent the knockdown interruptions.
Rewards[ | ]
Brown Wooden Chest
- See Shared Treasure
Completion Rewards
Note: Additional items may be rewarded randomly (need list!) but these are guaranteed every time.
Related Titles[ | ]
- Talk to Malatina after finishing the minigame one time.
- Title I: +250 Water Resistance, +10 % Drop Rate
- Talk to Malatina after finishing the minigame 30 times.
- Equipped: +15 Defense, +2 All Attributes, +100 HP
- Title II: +375 Water Resistance, +15 % Drop Rate
- Talk to Malatina after finishing the minigame 100 times.
- Equipped: +25 Defense, +6 All Attributes, +200 HP
- Title III: +563 Water Resistance, +20 % Drop Rate
- Talk to Malatina after finishing the minigame 150 times.
- Title IV: +844 Water Resistance, +25 % Drop Rate
Malatina's Course of Terror[ | ]
- Number of Players: 1
- Rounds: 4
- Time Limit: 15 minutes (you can extend it to 20 minutes by using a Curse Scroll (Time Extension))
- How to Enter: Talk to Malatina [Strange Clown] in Varanas Central Plaza, choose "Course of Terror" in the conversation window, and pay Phirius Token Coins ×30.
- Game Layout: Puzzle game with objects blocking your path that need different actions to get past them.
- Objective: Get to the exit of the 4th round before time runs out.
Guide[ | ]
There are 6 different types of seals in this minigame. Each one presents a unique barrier to your passage through the room, and the minigame focuses on the way this creates a puzzle.
- Seal (Iron Gate) - A wall with about 550k health. Use the Heavy Artillery to destroy Iron Gates strategically.
- Seal (Giant Vine) - A giant plant that can be destroyed by collecting a branch from it, then lighting the branch at a torch in the room entrance, then clicking the Giant Vine again to set it on fire.
- Seal (Void Summoning Barrier) - Summoning portal with about 10k health that summons a Clown Spirit with about 20k health. If you kill the clown spirit, another will be summoned if the Seal is not destroyed.
- Seal (Magic Gate) - Sends you back to the entrance of the round you're on. These can also kill a Clown Spirit if you lure one into it.
- Seal (Heavy Artillery Vehicle) - This becomes a 1-shot cannon that can destroy any other Seal in one shot. It's generally advised to use this on an Iron Gate to allow you to get farther into the room.
- Seal (Treasure Key) - Opening this will give you a Fine Key that can be used to open one of the Treasure Chests that you find between the rounds. Each round has the same number of key Seals as the round number (i.e. round 3 has 3 keys). The further you get the more keys you find, the more chests you get to open, the more rewards you get.
Tips[ | ]
Gear check: Seal (Void Summoning Barrier) has about 10k health, and summons Clown Spirits which have about 20k health until it is destroyed. Be sure you can quickly bring them down, so you don't use up too much time with fighting.
Uber gear check: If you do an astronomical amount of DPS, you can destroy Iron Gates without the need for a cannon. You should be able to hit for at least 50k before this is a realistic option based on the time it takes.
You can use a branch from one Seal (Giant Vine) to burn down another.
You can walk over a magic gate if you stick to the side. This will trigger gates and ghost clown containers.
You can skip opening the chests between rounds, and immediately go for the next round to save time (the Phirius Shells are the most useful reward anyway). Assuming you complete all rounds, you can open chests at the end with one ![]() Fine Key per Treasure Chest, otherwise you lose any unused
Fine Key per Treasure Chest, otherwise you lose any unused ![]() Fine Keys when time expires.
Fine Keys when time expires.
Curse Scrolls[ | ]
Curse Scrolls can be bought inside the instance for ![]() Ghost Card ×10 each before accepting the challenge, and can be found in a
Ghost Card ×10 each before accepting the challenge, and can be found in a ![]() Witchcraft Scroll Collection Box.
Witchcraft Scroll Collection Box.
- Curse Scroll (Cannon Permutation) - Turns a Seal (Giant Vine) within a range of 50 into a Seal (Heavy Artillery Vehicle).
- Curse Scroll (Instant Transport) - Transport yourself to the Course of Terror entrance (the place the treasure is at).
- Note: You will lose your chances for obtaining a Precious Key for that round.
- Curse Scroll (Time Extension) - Use this to change the time limit of Malatina's Course of Terror from 15 minutes to 20 minutes.
- Note: You must use it before the game starts in order for it to be effective.
- Curse Scroll (Wicked Freeze) - Permanently freezes all Clown Spirits and Void Summoning Barriers within a range of 150.
Special Timer Rules[ | ]
- Finish round 1 before 9:00 on the timer to make a Precious Chest appear, then finish round 2 within 3 minutes to receive the Precious Key that opens it.
- Finish round 3 before 6:00 on the timer to make a Precious Chest appear, then finish round 4 within 3 minutes to receive the Precious Key that opens it.
Rewards[ | ]
Normal Treasure Chest:
You will receive:
- Ghost Card ×0-1
- Simple Repair Hammer ×0-2
Plus a chance for ONE of the following:
- Random Fusion Stone
- Musical Instrument Bag
- Horse Rental Ticket
- Craftsman's Recipe Coupon - Contains one Common or Normal crafting box recipe
- Phirius Potions ×5
- Phirius Potions
Precious Chest (placed at the end of the row if you meet time requirements):
You will receive:
- Ghost Card ×1
- Simple Repair Hammer ×0-3
Plus a chance for ONE of the following:
- Magic Instrument Collection Box
- Royal Furniture Recipe Collection Box - random recipe for a royal furniture
- Temporary Mount Use Voucher - random 7- or 30-day mount
- Witchcraft Scroll Collection Box
- Phirius Token Coins ×10 - The same coins you get for doing Daily Quests.
- Phirius Token Coins ×20 - The same coins you get for doing Daily Quests.
Completion Rewards
- Phirius Shell ×50 (10 each for the first 3 rounds, 20 for the last round)
Related Titles[ | ]
- Trade Successfully Complete One time for it
- Equipped: None
- Title I: +250 Earth Resistance, +45 All Attributes
![]() Please give me a little more time
Please give me a little more time
- Trade Ghost Cards ×50 for it
- Equipped: +5 All Attributes, +28 Defense and +100 HP
- Title II: +375 Earth Resistance, +68 All Attributes
Ghost Card Collector [new]
- Have the previous title and trade Ghost Cards ×100 for it
- Equipped: +6 All Attributes, +30 Defense and +160 HP
- Title III: +563 Earth Resistance, +101 All Attributes
Fire! For victory! [new]
- Have the previous title and trade Ghost Cards ×150 for it
- Equipped: +8 All Attributes, +32 Defense, +180 HP and +10 Physical Crit Resistance
- Title IV: +844 Earth Resistance, +152 All Attributes
More bombing equals more treasures [new]
- Have the previous title and trade Ghost Cards ×200 for it
- Equipped: +12 All Attributes, +36 Defense, +320 HP and +12 Physical Crit Resistance
Who else wants to be cannon fodder? [new]
- Have the previous title and trade Ghost Cards ×250 for it
- Equipped: +15 All Attributes, +40 Defense, +350 HP and +15 Physical Crit Resistance
- Have the previous title and trade Ghost Cards ×??? for it
- Equipped: +20 All Attributes, +50 Defense, +400 HP and +20 Physical Crit Resistance
|
Lyliya's Magic House[ | ]
Three "styles", each with three levels. Nine rounds in all.
- Rewards: Speak to Lyliya back in Varanas Central Plaza to get your rewards.
- While playing you may get (between rounds):
- IF Primary Class >50: Phirius Shell ×25
- 40 points:
- Material Package for Magical Instruments - open to randomly obtain material for creating a magical instrument
- Lyliya's Colorful Glass Bead - Eventually exchangeable for Festival Furniture Transformation Eggs (complete his minigame 30 times to achieve her favor)
Use the Identify skill to identify what is different. The game ends when you get 10 wrong, run out of time, or finish all 9 rounds.
The first style[ | ]
Furniture that didn't exist before
The second style[ | ]
Furniture that changed it's position
The third style[ | ]
Furniture that changed it's appearance
Related Titles[ | ]
Liliya's Good Friend [new]
- Trade Liliya's favor towards you reached 30 for it
- Equipped: None
- Title I: +75 Stamina, +250 Dark Resistance
Goblin Games[ | ]
- Number of Players: 1-6 (one group)
- Time Limit: 30 minutes
- How to Enter: Talk to Mahler Palo [Goblin in Human's Clothing] in Silverfall next to the Auction House tent.
- Game Layout: A maze-like goblin mine containing 3 distinct areas of different enemies.
- Objective: Complete each of the 3 phases (see below) and open the 4 Treasure Chests that appear between each group of Elementals in the last phase (plus one Treasure Chest in a tent in Phase 2).
Note: Since this instance was designed for a group, it is by far the most demanding minigame when it comes to having a well-equipped character. If you plan to solo this instance, your character should have at least 20k health and be able to hit for 10k, and bring some potions or be able to heal yourself.
Note: Every member of the group can loot each chest in the instance. There is no downside to bringing in more people. If you're playing with a group, be sure everyone has entered the instance before accepting the challenge.
Guide[ | ]
There are three phases to this game. Completing each phase unlocks a door leading to the next area of the cave.
Phase 1 - Kill 40 worms
- The worms are fairly easy to kill but they tend to be situated in groups of 3 or 4, so be careful or have strong AOE abilities.
Phase 2 - Kill 60 goblins
- Each time you kill a goblin, every goblin in the instance gains a buff that adds 2% to their attributes, and this stacks. Thus, by the time you are done with the goblin phase, they will have +120% to their attributes.
- In the first part of this area, you'll see a ramp heading down with goblins on it. You will get at least 60 kills without going downstairs, and avoiding these guys will make it easier to reach the end. The fewer stacked buffs the goblins get, the better.
- Note: Because of the stacking buff, this is the hardest part of the dungeon. Goblins at the end will be hitting over twice as hard as the first goblins you saw.
Phase 3 - Kill elementals
- At the end of the goblin area there is a large room. Go up a ramp to find four groups of elemental monsters, one group each of water, wind, fire, and earth elementals. Killing the water elementals will spawn a boss elite monster that you have to fight (Evelyn: 220k health, easy fight if you've made it this far). Each time you kill a group of elementals, the structure they are near spawns a treasure chest for you to loot. Opening the last chest completes the minigame.
Finishing up
- After you have completed the elemental phase, a portal will appear downstairs that you can use to leave the instance, just step into the middle of the room and click confirm to leave.
Rewards[ | ]
Goblin Treasure Chest
- See Shared Treasure
Completion Rewards
- 50x Phirius Shell
- 3x Arcane Transmutor Charge
- 1x Master's Simple Repair Hammer
- 2x Goblin Champion Badge
Note: The Phirius Shells rewarded by this minigame are spread out across the 4 chests in the Elementals area, so make sure to open them all!
Note: Additional items may be rewarded randomly (need list!) but these are guaranteed every time.
Related Titles[ | ]
Goblin Hero [new]
- Trade 10 Goblin Champion Badges for it
- Equipped: None
- Title II: +375 Wind Resistance, +4 % TP Experience
Move along, Goblin! [new]
- Trade 100 Goblin Champion Badges for it
- Equipped Skill: Goblin Warrior
- Title III: +563 Wind Resistance, +6 % TP Experience
Green Miracle [new]
- Trade 250 Goblin Champion Badges for it
- Equipped Skill: Goblin Chief
- Title IV: +844 Wind Resistance, +8 % TP Experience
Ancient Treasure Hunt[ | ]
Number of Players: 1
Time Limit: 10 minutes
How to Enter: Talk to Ange Rasa in Sascilia Steppes (optional: talk to Kat Rojo in front of the Auction House in Varanas - Central Plaza in order to teleport to Ange Rasa)
Game Layout: A small maze-like dungeon that requires you to sneak past enemies instead of being able to fight them. All your class skills will be disabled, but you will be given event skills that will help you avoid detection.
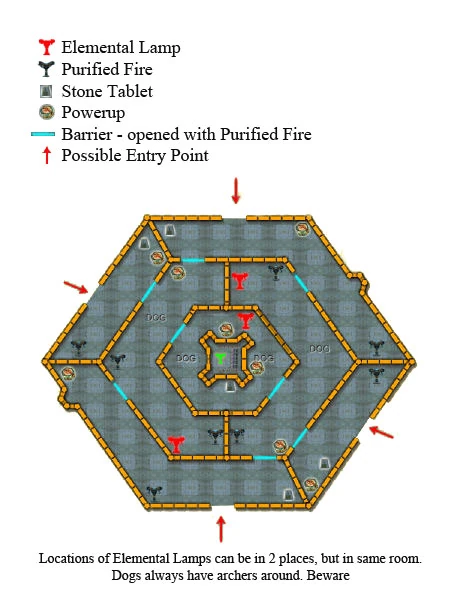
Objective: Light the 3 Elemental Lamps and then reach the treasure room in the middle of the map to collect your reward.
Guide[ | ]
A good guide and detailed map can be found at https://forum.runesofmagic.com/showthread.php?t=174361
Map[ | ]
Except for your starting location, and the placement of the Elemental Lamps, everything else will be in the same place every time in this instance.
Note: One Elemental Lamp will be found in each of the rooms with a red lamp icon in it. Each room has 2 possible locations for a Lamp - only 3 of the 6 total locations are marked on this map.
Skills[ | ]
| Name | Icon | Cast Time | Cooldown | Effect |
|---|---|---|---|---|
| Invisibility | 
|
1 sec | 30 sec | You become invisible for 15 seconds, so enemies won't attack you. Ghost guard dogs can still see you under this effect! This ability reduces your movement speed while active. |
| Feign Death | 
|
instant | 1 min | You fall to the floor, leaving combat. Lasts up to 5 minutes. After a few seconds, enemies will lose interest in you and resume their standard movement paths. When you're ready to get up, you must manually cancel this ability by right clicking its buff icon (default for this interface piece is near your minimap) |
| Snipe | 
|
2 sec | 3 min | Kill any enemy in one hit. |
| Binding Chain | 
|
1 sec | 20 sec | Root your enemy in place for 10 seconds. Warning: Ghost archers can still attack and use their abilities under root effect! Excellent when combined with Feign Death. |
| Using a power-up box will give you a random ability from the list below. You can only use these abilities once, unless you get another power-up box with the same ability in it. | ||||
| Azure Rejuvenation power-up only |
instant | 15 sec | Restores 100% of maximum HP. | |
| Ghost Cavalier power-up only |

|
instant | 3 sec | Transform into a Ghost Cavalier for 15 seconds, instantly leaving combat and making all enemies ignore you. |
| Protective Shield power-up only |

|
instant | none | You become invincible for 15 seconds. |
| Poisonous Trap power-up only |

|
2 sec | 3 seconds | Lay down a trap for enemies that deals 20% of their max health over 10 seconds. |
Rewards[ | ]
Ancient Treasure chest
- See Shared Treasure
Jade Treasure Chest
- Rank 3 runes (Tier 3)
- Rank 7 runes (Tier 1-2)
Amethyst Treasure Chest
- Abysmal 30day mount parts (contract, core, fragment I,II,III,Armor)
- Infernal 30day mount parts (contract, core, fragment I,II,III)
Completion Rewards
- 30x Phirius Shell (obtained along with the contents of the first chest you open in the treasure room)
Note: Additional items may be rewarded randomly (need list!) but these are guaranteed every time.
Related Titles[ | ]
Treasure Seeker
Finish the minigame once.
(Talk to Ange Rassa)
*Title I: +250 Fire Resistance, +2 % Experience Value Rate
Ghost Cavalier Criminal
Finish the minigame 10 times.
*Title II: +375 Fire Resistance, +4 % Experience Value Rate
Rune Investigation Team Hero
Trade 30 Ruins Investigation Medals (this title does not appear to give any bonuses).
Treasure Hunter
Finish the minigame 50 times.
*Title III: +563 Fire Resistance, +6 % Experience Value Rate
Owner of the Treasure Mountain
Finish the minigame 100 times.
*Title IV: +844 Fire Resistance, +8 % Experience Value Rate
Andor Training Range[ | ]
- Number of Players: 1
- Time Limit: ∞ or 3 and 1/2 minutes
- How to Enter: Talk to Kate Wesker in Varanas Central Plaza
- NPC Text: PLAYERNAME, I noticed that you're a very experienced adventurer. I believe, however, more challenges await you in the future and I'd be glad to offer you an opportunity to improve your skills. The Eye of Wisdom is holding a training program on magical skills in the Andor Training Range. You will be trained how to quickly an precisely cast magical spells on your target. What's more, the Andor instructors will reward those who give outstanding performances. I can send you over to the Andor Training Range, do you want to have a try?
- Objective: Get the highest score possible.
Guide[ | ]
You get an Extra Skill to use, it 1 shots the mobs in Andor Training Range.
There are 2 modes to Andor Training Range:
- TIMED: In this mode you have 3 and 1/2 minutes to kill as many mobs as you can.
- ARENA: In this mode you aren't timed, however there are only 10 waves.
No matter which mode you pick there is an overriding rule. Don't let them cross the red line on the right. Once 5 Mobs get across there, It's Game over!
Rewards[ | ]
Phirus Shell ×?? (depending on your score)
- 1-1500: Phirus Shell ×10
- 1501-2700: Phirus Shell ×20
- >2700: Phirus Shell ×30
No matter what your score is these rewards are randomized. You can receive up to 3 Guild donations, and up to 3 Certificate Rewards. It has been noted, and confirmed, that the drop chance increases the higher the score. This means on an average Player 1 with a score of 3,000 will get more rewards than player 2 with a score of 2,000.
Guild Donation Rewards[ | ]
- Teardrop Ruby ×5 (Each is worth Guild Ruby ×100)
- Nightmare Essence ×5 (Each is worth Guild Rune ×100)
- Wisdom Core ×5 (Each is worth Guild Stone ×100)
- Magic Fortune Grass ×5 (Each is worth 100 Guild Herbs)
- Sunset Ear of Grain ×5 (Each is worth 100 Guild Wood)
- Moonlight Pearl ×5 (Each is worth 100 Guild Ore)
Certificate Rewards[ | ]
- Certificate: The Key to Timing
- Certificate: The Key to Survival
You need to hand in one of each certificate to Kate Wesker to receive Turn-In Rewards.
Turn-In Rewards[ | ]
You Will ALWAYS receive 3 rewards.
- Vanquisher's Loot (Material for Crafting Boss Furniture)
- Random Boss Monster Crafting Recipe (royal furniture)
Plus 1 of the Following:
- Transport Rune ×10
- Home-sweet-home ×10
- Guild Castle Transport Stone ×6 or 10
- Marking Ink ×10
- Transport Portal Rune ×5
- Simple Repair Hammer ×3
- Big Angel's Sigh ×3
- Pheonix's Redemption
- 50 Arcane Transmutor Charges
- 5 Arcane Transmutor Charges
- Arcane Transmutor Charge ×5
- Master's Simple Repair Hammer
- Bank Space Scroll II (7 Days)
Related Titles[ | ]
- Gain 30 or more points from a single Newt Explosion
- Complete 10 Waves in Timed mode
- Complete 10 waves in ARENA Mode
- Gain a Score of 2700 or more in TIMED Mode
- Gain a Score of 2700 or more in ARENA Mode
Tips and Tricks[ | ]
I currently hold the highest score in Andor on my server. Many people have asked me how I get such a high score. There are 2 ways. The first is illegal and that is setting up a bot to auto click for you. The second is setting hotkeys. I recommend setting the key for shooting the skill to NUM1 if you are playing with a keyboard with the Num-pad.
The second trick is noticing there is no CD (cooldown) on the skill. There is a GCD of 0.1. This means you can only hit up to 10 targets every second. Even I am unable to aim that fast. This means the only limit to how fast you can kill the mobs is how fast you can click.
Mouse sensitivity is key here. You want it high enough so that you barely have to move the mouse to get to the next mob. But not to high that you scroll over the next mob. On top of this always aim for the front of the mob if possible. The server and the client are not perfectly in Sync. The lag is dependent on your ping. The higher the ping the further forward on the mob you want to aim.
The order in which you hit mobs is important. For arena: The best strategy is to kill the mobs in this order: Bugs first, Rabbits second, Tortoises third, and Newts last. For timed: The best strategy is to kill the mobs in this order: Newts first, Tortoises second, Rabbits third, and Bugs last. It is a matter of luck on the powerup's you obtain. For timed you are looking to complete 19 waves. It sounds near impossible but it has been done. You are looking to get all AOE powerup's(The one that looks like a flame rune). For arena you are looking to maximize your score so never use the AOE's if you get them. Only use the slow downs.